Tuesday, November 5, 2013

Create a Full Database Backup (SQL Server)


Examples (Transact-SQL)

 The following example backs up the complete 
    AdventureWorks2012
   database to disk, by using FORMAT to create a new media set.
 
 
USE AdventureWorks2012;
GO
BACKUP DATABASE AdventureWorks2012
TO DISK = 'Z:\SQLServerBackups\AdventureWorks2012.Bak'
   WITH FORMAT,
      MEDIANAME = 'Z_SQLServerBackups',
      NAME = 'Full Backup of AdventureWorks2012';
GO


ref:
http://technet.microsoft.com/en-us/library/ms187510.aspx
 

Friday, November 1, 2013

LocalDB: Where is My Database?

As I mentioned in the previous post LocalDB handles database files differently than regular SQL Server.
The regular SQL Server assumes that it is actively managed by a DBA. The DBA carefully configures SQL Server during the installation and afterwards. The DBA decides where SQL Server binaries are installed. The DBA also decides where the system database files are located. The location of the system databases also becomes the default location for all user databases.
LocalDB is different. It's built to be used by developers, not DBAs. And we have heard developers saying loud and clear that they just want to focus on their databases and database code. Therefore our primary design goal was to eliminate all the server configuration and management that is getting in their way. As a result LocalDB stores all the system databases deep inside the "hidden" AppData folder in the user profile. For example, after playing with the Automatic Instance in the previous post, I find this folder in my user profile:

This folder constitutes my Automatic LocalDB Instance. Any good DBA will explain in great and painful details what these files are, but if you are a developer this is the first and the last time you will look at them. Which is great, but left us with an interesting question. If the location of system databases is hidden from the developer, what should the default location for the databases created by the developer be? Creating user databases in a hidden folder didn't seem like the right design. We considered My Documents too, but that could give the impression that SQL Server databases are portable documents. Plus half of our team was using some sort of document synchronization solution, like Live Mesh. Those would quickly destroy the database files and we thought they will only get more popular over time, thus more likely to wreck havoc in the future.
In the end we decided to create the database files in the root of the user profile. On most machines it is located in C:\Users\user-name folder
In the spirit of a scientific approach, let's try it out. Open SSMS and connect to your Automatic Instance:

Then create database foo without specifying the location for its files:
create database foo
Open Windows Explorer and navigate to your profile (typing %USERPROFILE% in the address bar is a nice shortcut). If the database was created successfully there will be new files in this folder, foo.mdf and foo_log.ldf that represent your database. QED.
Given that user profile folder is likely not the best location to store database files, we advise developers creating databases to always specify the location for the database files, like in this T-SQL example:
create database foo on (name='foo', filename='c:\DBs\foo.mdf')
- Krzysztof Kozielczyk


ref:
http://blogs.msdn.com/b/sqlexpress/archive/2011/10/28/localdb-where-is-my-database.aspx
Saturday, October 26, 2013

File name change before saveAs()


string fileName= DateTime.Now.ToString("yyyyMMddHHmmtt") + fileExt; resumeUplaod.SaveAs(Server.MapPath("Resume/") + fileName);

Friday, October 25, 2013

AJAX Control Toolkit error: ""sys.extended.ui is null or not an object"

When using the AJAX Control Toolkit you see a strange error: you recieve a client-script exception message that says "system.extended.ui is null or not an object".


The fix is to ensure that the ToolkitScriptManager on the page has the CombineScripts attribute set to false as shown:

<ajaxToolkit:ToolkitScriptManager runat="server" ID="ajaxScriptManager" EnablePartialRendering="true" CombineScripts="false" /> 

The ToolkitScriptManager class derives from ScriptManager and enables the automatic combining of multiple script files in the corresponding web page. Any scripts (and localized script resources) coming from assemblies indicating their willingness to have their scripts combined (with the new assembly-level ScriptCombine attribute) will automatically be combined into one file for download by the user's browser. This combining action (and the automatic compression of the resulting file) can dramatically reduce the number of round-trips made by the browser to fetch scripts and correspondingly improve the page's responsiveness.

While desireable,  this behavior can still clobber some pages, causing the above-referenced error, which is why the CombineScripts="false" attribute is provided.


By Peter Bromberg
ref :
http://www.nullskull.com/faq/850/ajax-control-toolkit-error-sysextendedui-is-null-or-not-an-object.aspx


Thursday, October 17, 2013

refresh dropdown list with out change stateview in asp.net


---------------in page load ------------------------------------------------------------------------
 //craete view stat object carry the selected data on dropdownlist

  ViewState["DropDownList3"] = DropDownList3.SelectedValue;

--------------------------in the event button ---------------------------------------------------------
  protected void DetailsView1_ItemUpdated(object sender, DetailsViewUpdatedEventArgs e)
        {
       
// on the event fire now will refersh the dropdown datat and keep the state view
            DropDownList3.DataBind();

            if (ViewState["DropDownList3"] != null)
            {
              

                DropDownList3.SelectedValue = ViewState["DropDownList3"].ToString();
            }
        }

How to refresh Gridview after pressed a button in asp.net ?


after updating data you may need to refresh the grid to see the new data ----------------solution ------------------------

 protected void UpdateButton_Click(object sender, EventArgs e) { //your same code ........ GridView1.DataBind(); }

Tuesday, September 24, 2013

What happened to the Run command?


The Run command no longer appears on the Start menu in this version of Windows. The search box that appears on the Start menu provides much of the same functionality as the Run command. However, the Run command is still available if you prefer to use it. You can even add it to the Start menu for easier access.

To add the Run command to the Start menu

  1. Open Taskbar and Start Menu Properties by clicking the Start button Picture of the Start button, clicking Control Panel, clicking Appearance and Personalization, and then clicking Taskbar and Start Menu.
  2. Click the Start Menu tab, and then click Customize.
  3. In the list of Start menu options, select the Run command check box, and then click OK. The Run command will be displayed on the right side of the Start menu.

Tip

  • You can also access the Run command by pressing the Windows logo key Picture of the Windows logo key+R.

How to uninstall or remove Microsoft Office 2007 suites

We recommend that you follow the provided methods in this article in order. However, if you have previously tried one of the methods to remove Office and it has failed, you can jump to another method quickly from this list:
  • Method 1: Uninstall Microsoft Office 2007 suites from Control Panel
  • Method 2: Uninstall Microsoft Office 2007 suites with Microsoft Fix it
  • Method 3: Uninstall Microsoft Office 2007 suites with the Program Install and Uninstall troubleshooter
  • Method 4: Remove Microsoft Office 2007 suites manually

Method 1: Uninstall Microsoft Office 2007 suites from Control Panel

To remove Microsoft Office 2007 from Control Panel, follow these steps:
  1. Click Start.
  2. Click All Programs, and then open the Accessories folder (skip this step in Windows XP).
  3. Click Run, and then click in the Open box.
  4. Type appwiz.cpl, and then click OK.
  5. Locate the Microsoft Office entry in the list of currently installed programs.
  6. Select it, and then click Uninstall (or Remove in Windows XP).
If you have problems uninstalling the 2007 Microsoft Office system in Control Panel, go to the next method.

Method 2: Uninstall Microsoft Office 2007 suites with Microsoft Fix it

WARNING: The Fix it solution does not remove individual Office programs that were installed separately on your computer. For example, if you have Microsoft Office Professional 2007 and Microsoft Office Visio 2007, the Fix it solution will only remove Microsoft Office Professional 2007. Visio 2007 will not be removed. Click here to view information about removing individual Office programs.

IMPORTANT - Read these notes before you use the Fix it solution:
  • If you have a Windows 64-bit operating system, download and save the Fix it solution to your desktop and double-click and run it on your computer. If you try to run the solution directly from the article you will have problems running it correctly.
  • You must restart your computer if you use the Fix it solution.
  • The wizard may be in English only. However, the automatic fix it also works for other language versions of Windows.
  • If you are not on the computer that has the problem, save the Fix it solution to a flash drive or a CD or DVD and then run it on the computer that has the problem.
The Fix it solution for Microsoft Office 2007 suites will remove all Office 2007 editions. This includes all Office 2007 trial editions.

To uninstall the 2007 Microsoft Office suite automatically, click the Fix this problem button or link. Click Run in the File Download dialog box, and then follow the steps in the Fix it wizard.
Fix this problemFix this problem
Microsoft Fix it 50154


If you still cannot uninstall the Microsoft Office suite, go to the next method.

Method 3: Uninstall Microsoft Office 2007 suites with the Program Install and Uninstall troubleshooter


Method 4: Remove Microsoft Office 2007 suites manually

Note You must be logged on to Windows with a user account that is a computer administrator to complete this method. If this is your personal computer, you are likely already logged on with an administrator account. If this is a computer that is part of a network, you might have to ask the system administrator for help. To verify that you are logged on to Windows with a user account that is a computer administrator, visit the following Microsoft knowledge base article:


IMPORTANT - Information that you need to know before you remove Office 2007:
  • To use the View or Tools menu in Windows 7 or Vista, you must press the ALT key first to display the menu bar.
  • You will need to view hidden files and folders. To do this, follow these steps:
    1. Open Windows Explorer.
    2. On the Tools menu, click Folder Options. In Windows 7 or Vista, press the ALT key to display the menu bar.
    3. Click the View tab.
    4. In the Advanced settings pane, under Hidden files and folders, click Show hidden files and folders.
    5. Clear Hide extensions for known file types.
    6. Click OK, and then close the windows.

Step 1: Remove any remaining Windows Installer packages of the 2007 Microsoft Office system.
  1. Click Start.
  2. Click All Programs, and then open the Accessories folder (skip this step in Windows XP).
  3. Click Run, and then click in the Open box.
  4. Type installer, and then click OK.
    This opens the %windir%\Installer folder.
  5. On the View menu, click Choose Details.
  6. Click to select the Subject check box, type 340 in the Width of selected column (in pixels) box, and then click OK.
    Note It may take several minutes for the subjects to appear next to each .MSI file.
  7. On the View menu, point to Sort by in Windows 7 or Vista, or point to Arrange icons by in Windows XP, and then click Subject.
  8. If a User Account Control dialog box appears, click Allow to continue.
  9. Locate each .MSI file where the subject is "Microsoft Office <product name> 2007," right-click the .MSI file, and then click Uninstall.
    Note <product name> is a placeholder for the name of the 2007 Microsoft Office product.
Step 2: Stop the Office Source Engine service.
  1. Click Start.
  2. Click All Programs, and then open the Accessories folder (skip this step in Windows XP).
  3. Click Run, and then click in the Open box.
  4. Type services.msc, and then click OK.
  5. In the Services window, determine whether the Office Source Engine service is running ("Started" will appear in the Status column). If the service is running, right-clickOffice Source Engine, and then click Stop.
  6. Close the Services window.
Step 3: Remove any remaining 2007 Microsoft Office installation folders.
  1. Click Start.
  2. Click All Programs, and then open the Accessories folder (skip this step in Windows XP).
  3. Click Run, and then click in the Open box.
  4. Type %CommonProgramFiles%\Microsoft Shared, and then click OK.
    Note On a computer that is running a 64-bit version of Windows 7 or Vista, type %CommonProgramFiles(x86)%\Microsoft Shared, and then click OK.
  5. If the following folders are present, delete them:
    • Office12
    • Source Engine
  6. Click Start.
  7. Click All Programs, and then open the Accessories folder (skip this step in Windows XP).
  8. Click Run, and then click in the Open box.
  9. Type %ProgramFiles%\Microsoft Office, and then click OK.
    Note On a computer that is running a 64-bit version of Windows 7 or Vista, type %ProgramFiles(x86)%\Microsoft Office, and then click OK.
  10. Delete the Office12 folder.
  11. On the root folder of each hard disk drive, locate and then open the MSOCache folder. If you cannot see this folder, follow these steps:
    1. Open Windows Explorer, and then on the Tools menu, click Folder Options.
    2. Click the View tab.
    3. In the Advanced settings pane, under Hidden files and folders, click Show hidden files and folders.
    4. Clear the Hide protected operating system files check box, and then click OK.
  12. Open the All Users folder in the MSOCache folder, and then delete every folder that contains 0FF1CE}- text in the folder name.
    Note This text contains a zero and a one for the letters "O" and "I."
    Example {90140000-001B-0409-0000-0000000FF1CE}-C
Step 4: Remove any remaining 2007 Microsoft Office installation files.
  1. Click Start.
  2. Click All Programs, and then open the Accessories folder (skip this step in Windows XP).
  3. Click Run, and then click in the Open box.
  4. Type %appdata%\microsoft\templates, and then click OK.
  5. Delete the following files:
    • Normal.dotm
    • Normalemail.dotm
  6. Click Start.
  7. Click All Programs, and then open the Accessories folder (skip this step in Windows XP).
  8. Click Run, and then click in the Open box.
  9. Type %appdata%\microsoft\document building blocks, and then click OK.
  10. Open the subfolder found in the Document Building Blocks folder.
    Note The subfolder title will be a four-digit number that represent the language of the Microsoft Office suite.
  11. Delete the building blocks.dotx file.
  12. Close all programs before you follow the rest of the steps.
  13. Click Start.
  14. Click All Programs, and then open the Accessories folder (skip this step in Windows XP).
  15. Click Run, and then click in the Open box.
  16. Type %temp%, and then click OK.
  17. On the Edit menu, click Select All.
  18. On the File menu, click Delete.
  19. Click Start.
  20. Click All Programs, and then open the Accessories folder (skip this step in Windows XP).
  21. Click Run, and then click in the Open box.
  22. Type %AllUsersprofile%\Application Data\Microsoft\Office\Data, and then click OK.
  23. Delete the opa12.dat file (and ONLY this file).
Step 5: Remove the registry subkeys of the 2007 Microsoft Office system.
Warning Serious problems might occur if you modify the registry incorrectly by using Registry Editor or by using another method. These problems might require that you reinstall the operating system. Microsoft cannot guarantee that these problems can be solved. Modify the registry at your own risk.

Important This article contains information about how to modify the registry. Make sure that you back up the registry before you modify it. Make sure that you know how to restore the registry if a problem occurs. For more information about how to back up, restore, and modify the registry, click the following article number to view the article in the Microsoft Knowledge Base:
322756 How to back up and restore the registry in Windows

Locate and then delete the Office 2007 registry subkeys if they are present. To do this, follow these steps:
  1. Click Start.
  2. Click All Programs, and then open the Accessories folder (skip this step in Windows XP).
  3. Click Run, and then click in the Open box.
  4. Type regedit, and then click OK.
  5. Click the following registry subkey:

    HKEY_CURRENT_USER\Software\Microsoft\Office\12.0
  6. On the File menu, click Export, type DeletedKey01, and then click Save.
  7. On the Edit menu, click Delete, and then click Yes to confirm.
  8. Repeat these steps (1 through 7) for each registry subkey in the following list. Change the name of the exported key by one for each subkey.
    Example Type DeletedKey02 for the second key, type DeletedKey03 for the third key, and so on.
Note In the following registry keys, the asterisk character (*) represents one or more characters in the subkey name.

32-bit versions of Microsoft Windows
  • HKEY_CURRENT_USER\Software\Microsoft\Office\12.0
  • HKEY_LOCAL_MACHINE\SOFTWARE\Microsoft\Office\12.0
  • HKEY_LOCAL_MACHINE\SOFTWARE\Microsoft\Office\Delivery\SourceEngine\Downloads\*0FF1CE}-*
  • HKEY_LOCAL_MACHINE\SOFTWARE\Microsoft\Windows\CurrentVersion\Uninstall\*0FF1CE*
  • HKEY_LOCAL_MACHINE\SOFTWARE\Microsoft\Windows\CurrentVersion\Installer\Upgrade Codes\*F01FEC
  • HKEY_LOCAL_MACHINE\SOFTWARE\Microsoft\Windows\CurrentVersion\Installer\UserData\S-1-5-18\Products\*F01FEC
  • HKEY_LOCAL_MACHINE\SYSTEM\CurrentControlSet\Services\ose
  • HKEY_CLASSES_ROOT\Installer\Features\*F01FEC
  • HKEY_CLASSES_ROOT\Installer\Products\*F01FEC
  • HKEY_CLASSES_ROOT\Installer\UpgradeCodes\*F01FEC
  • HKEY_CLASSES_ROOT\Installer\Win32Assemblies\*Office12*
64-bit versions of Microsoft Windows
  • HKEY_CURRENT_USER\Software\Microsoft\Office\12.0
  • HKEY_LOCAL_MACHINE\SOFTWARE\Wow6432Node\Microsoft\Office\12.0
  • HKEY_LOCAL_MACHINE\SOFTWARE\Wow6432Node\Microsoft\Office\Delivery\SourceEngine\Downloads\*0FF1CE}-*
  • HKEY_LOCAL_MACHINE\SOFTWARE\Wow6432Node\Microsoft\Windows\CurrentVersion\Uninstall\*0FF1CE*
  • HKEY_LOCAL_MACHINE\SOFTWARE\Wow6432Node\Microsoft\Windows\CurrentVersion\Installer\UpgradeCodes\*F01FEC
  • HKEY_LOCAL_MACHINE\SOFTWARE\Wow6432Node\Microsoft\Windows\CurrentVersion\Installer\UserData\S-1-5-18\Products\*F01FEC
  • HKEY_LOCAL_MACHINE\SYSTEM\CurrentControlSet\Services\ose
  • HKEY_CLASSES_ROOT\Installer\Features\*F01FEC
  • HKEY_CLASSES_ROOT\Installer\Products\*F01FEC
  • HKEY_CLASSES_ROOT\Installer\UpgradeCodes\*F01FEC
  • HKEY_CLASSES_ROOT\Installer\Win32Asemblies\*Office12*
Continue with these registry subkeys:
  1. Locate the following registry subkey:

    32-bit: HKEY_LOCAL_MACHINE\SOFTWARE\Microsoft\Windows\CurrentVersion\Uninstall
    64-bit: HKEY_LOCAL_MACHINE\SOFTWARE\Wow6432Node\Microsoft\Windows\CurrentVersion\Uninstall
  2. On the File menu, click Export, type UninstallKey01, and then click Save.
  3. Under the Uninstall subkey that you located in step 1, click each subkey, and then determine whether the subkey has the following value assigned to it:
    • Name: UninstallString
    • Data: file_name path\Office Setup Controller\Setup.exe path

      Note In this example, file_name is a placeholder for the name of an installation program, and path is a placeholder for the file path.
  4. If the subkey contains the name and the data that are described in step 3, click Delete on the Edit menu. Otherwise, go to step 5.
  5. Repeat steps 3 and 4 until you locate and then delete every subkey that matches the name and the data that are described in step 3.
  6. Close Registry Editor.
Step 6: Restart the computer.
Restart the computer. If the removal was successful, you are finished and can now reinstall Microsoft Office if you want. If the removal was not successful, go to the "References" section in this article.


ref
-------------------------------------------------
http://support.microsoft.com/kb/928218

Sunday, September 22, 2013

How to add ASP.NET 4.0 as Application Pool on IIS 7, Windows 7


Configuring servers is not my strong suit by any means. I'm trying to move a development project to Windows 7. One of the things that I need to run the application is to select ASP.NET v4.0 as the application pool within IIS.
I went through the directions in the following link to make sure that the proper Application Development Options were selected:
http://www.gotknowhow.com/articles/how-to-install-iis7-and-enable-aspnet
From within the IIS Manager, I select Application Pools and only see
- Classic .NET AppPool
- DefaultAppPool
I need to also be able to select from
- ASP.NET v4.0
- ASP.NET v4.0 Classic
How can I add these to the list of available application pools?
------------------------------------------------------------------  
solution


Chances are you need to install .NET 4 (Which will also take care of a new AppPool for you)
First make sure you have IIS installed then perform the following steps:
  1. Open your command prompt (Windows + R) and type cmd and press ENTER
    You may need to start this as an administrator if you have UAC enabled.
    To do so, locate the exe (usually you can start typing with Start Menu open), right click and select "Run as Administrator"
  2. Type cd C:\Windows\Microsoft.NET\Framework\v4.0.30319\ and press ENTER.
  3. Type aspnet_regiis.exe -ir and press ENTER again.
    • If this is a fresh version of IIS (no other sites running on it) or you're not worried about the hosted sites breaking with a framework change you can use -i instead of -ir. This will change their AppPools for you and steps 5-on shouldn't be necessary.
    • at this point you will see it begin working on installing .NET's framework in to IIS for you
  4. Close the DOS prompt, re-open your start menu and right click Computer and select Manage
  5. Expand the left-hand side (Services and Applications) and select Internet Information Services
    • You'll now have a new applet within the content window exclusively for IIS.
  6. Expand out your computer and locate the Application Pools node, and select it. (You should now see ASP.NET v4.0 listed)
  7. Expand out your Sites node and locate the site you want to modify (select it)
  8. To the right you'll notice Basic Settings... just below the Edit Site text. Click this, and a new window should appear
  9. Select the .NET 4 AppPool using the Select... button and click ok.
  10. Restart the site, and you should be good-to-go.
(You can repeat steps 7-on for every site you want to apply .NET 4 on as well).

 ref.......................
Brad Christie
http://stackoverflow.com/questions/4890245/how-to-add-asp-net-4-0-as-application-pool-on-iis-7-windows-7

Thursday, September 19, 2013

FIX: It is an error to use a section registered as allowDefinition='MachineToApplication' beyond application level. This error can be caused by a virtual directory not being configured as an application in IIS


I teach two six week courses on ASP.NET at the University of California - San Diego Extension. The first class serves as an introduction to ASP.NET and as such many of the students create their first ASP.NET websites in class. During the first meeting students create a simple ASP.NET website. At the end of the first evening, those students who did not bring their own laptop need to work on their website from home or work; they may copy the files to a thumb drive or ZIP up the files and send them via email. In either case, it's not uncommon for students to bump into the following error when opening the website to bump into the following error message: It is an error to use a section registered as allowDefinition='MachineToApplication' beyond application level. This error can be caused by a virtual directory not being configured as an application in IIS. This error message isn't the most sensible error message, especially those to ASP.NET, so let me try to explain it. Configuration information for an ASP.NET website is defined in one or more Web.config files. The configuration settings are applied in a hierarchical manner. There's a “global” Web.config file that spells out the baseline configuration information for all websites on the web server; this file lives in the %WINDIR%\Microsoft.Net\Framework\version\CONFIG folder. You can also have a Web.config file in the root folder of your website. This Web.config file can override settings defined in the “global” Web.config file, or add new ones. Additionally, you may have Web.config files in the subfolders of your website, which define new configuration settings or override configuration settings defined in Web.config files higher up in the hierarchy. Certain configuration elements in Web.config cannot be defined beyond the application level, meaning that they must be defined in the “global” Web.config file or in the Web.config file in the website's root folder. The element is one such example. The above error message indicates that there is a Web.config file in one of the website's subfolders than has one of these configuration elements that cannot be defined beyond the application level. This problem most commonly arises when you open the website in Visual Studio but accidentally open the parent of the root folder. For example, imagine that you have a website located at C:\MyProjects\Website1, where the Website1 folder is the root of the website. When you open this website from Visual Studio you are asked to specify the website's root folder - it is imperative that choose the Website1 folder. If you accidentally select the MyProjects folder then the Web.config file in the Website1 folder is now in one of the website's subfolders. Because that Web.config file includes the element, among other application-level settings, you'll receive the above error. The fix to this error (in most cases), then, is to close your project and reopen it from Visual Studio, making sure that you select the appropriate folder. Happy Programming!

Tuesday, September 17, 2013

Prefer Using Nested Master Pages Over Separate Master Pages

Most of the websites I've worked on have had an overarching site design with various sections of the site that differ slightly from one another. I've worked on an eCommerce site that had a common layout among all pages - a menu at the top, information about the user and their cart in the upper right corner, legalese at the bottom, section-specific links on the left, and so on - but had minor customizations for the various sections. There were a total of four logical sections: general, non-product-specific pages; general products; logoed merchandise; and order fulfillment pages. The background image used at the top of the page differed among the four sections, and there were different links and slight layout differences in the upper right corner. One approach to managing these differences would be to have four master pages in the project, one for each section. The problem with this approach is that it involves a lot of repeated markup and code, as more than 90% of the site design and layout markup between the sections was identical. As a result, any changes to the overarching design would require modifying the markup in all four master pages. A better approach is to use nested master pages. Much like how an ASP.NET page can have a master page, a master page may also be assigned a master page. Such master pages are said to be nested. With nested master pages you could define a "root" master page that defines the markup and layout that is common to all sections and then create a nested master page for each of the four sections. The content pages in each section would then use the appropriate nested master page. The net benefit of this approach is that the overarching site design markup is consolidated into one "root" master page and the nested master pages contain only the variations among the sections. This makes it much easier to modify the site-wide design and have those changes instantaneously applied to all sections. For more information on using nested master pages, check out Scott Guthrie's blog entry, Visual Studio 2008 Nested Master Page Support. Also reference the tutorial Nested Master Pages. Conclusion Master pages offer ASP.NET page developers an easy way to define a site-wide design and to have it apply to all content pages. All ASP.NET websites should include a master page and that master page should be the first thing added to the project. This article dispensed some master pages advice along with some tips and tricks. If you have additional advice or tips regarding master pages, please share them with your fellow readers by sending them to me. I'll happily add such recommendations to this article. Happy Programming!
http://www.4guysfromrolla.com/articles/062409-1.aspx

Saturday, May 25, 2013

sqlsrv.dll, PDO and PHP 5 on Windows via WAMP


Here’s one that had us stumped. We share this knowledge with anybody else who may be suffering from a similar situation. After publishing one of our WebApps to a client’s server, we were hit with an error stating that dblib wasn’t available. The solution was coded in PHP, with Zend Framework on a Centos 5 server. We are now publishing to a Windows Server 2008 machine running SQL Server 2008 and WAMP. Looking into the PHP manual, we realised that dblib was no longer supported on Windows. Instead, Microsoft have provided useful drivers to connect to SQL Server databases, which can be found at http://www.microsoft.com/download/en/details.aspx?id=20098 OK, no problem, we downloaded the folders, copied them to the PHP “ext” folder and configured php.ini with the necessary lines, e.g. extension=php_pdo_sqlsrv_53_ts_vc9.dll But after restarting and checking a page with phpinfo(), we found the extension failed to load every time. It wouldn’t appear. PDO was installed and appearing, the MySQL extension registered fine too. After some investigation, we found the cause… The server contained the 64 bit version of WAMP installed, but the drivers for sqlsrv are only compatible with the 32 bit version. So after removing and installing the 32 bit version, all is well. This worked for us at least. WAMP version was WAMP 2.2, PHP 5.3.8. Server running Windows Server 2008 with SQL Server 2008. Good luck!
This entry was posted in Development by John. Bookmark the permalink.

Monday, March 4, 2013

Automatically Delete Temporary Files in Windows 7 [How To]

The Windows Disk Cleanup Wizard will delete your temporary files, but only if they are over a week old. To create a simple batch script that will clean up your temporary directories, do the following (Vista instructions):

Creating the Batch File to Clean Temporary Files

  1. Open Notepad and type the following:
    cd C:\Users\%username%\AppData\Local
    rmdir /S /Q Temp
  2. Save the file as cleantemp.bat
    cleantemp Automatically Delete Temporary Files in Windows 7 [How To]
  3. Now double click on the file to remove your temporary files and free up space on your computer
If this doesn’t work and gives an access error, try replacing %username% with you windows login username.

Automating the Process of Deleting Temporary Files

To automate this process, so you do not need to remember to run it, do the following:
  1. Right click on the batch file and select create shortcut
  2. Place the shortcut in your startup folder in the start menu
Now when you log in to Windows 7, your temporary files will be deleted.


ref:
http://mintywhite.com/windows-7/7maintenance/automatically-delete-temporary-files-windows-7/

Sunday, March 3, 2013

ASP.Net Web Matrix: Change SQL Espress Authentication and Enable SA from the Command Prompt

how to use joomla with sql server express using web matrix2 


  When SQL Server Express is installed with default options it is setup with Integrated Windows Security and the SA (Administrator) account disabled, for example when installed as part of Visual Studio. Additionally, in many cases the SQL Server Management Studio Express is not installed, so that a graphical interface to change to a Mixed Security and enabled SA account does not exist. Many of the ASP.Net templates integrate into ASP.Net Web Matrix like Umbraco and SrewTurn Wiki require this Mixed Security scenario, so here are the steps to change from Integrated to Mixed Security and enable the SA account with a password from the command prompt. This is assuming SQL Server Express 2008 R2, the step 4 key is slightly different with 2008/2005 installs.

1. Launch cmd.exe to enter Command Prompt

2. Run net stop MSSQL$SQLEXPRESS

 3. Run regedit

4. In the Registry Editor change the key HKEY_LOCAL_MACHINE\Software\Microsoft\Microsoft SQL Server\MSSQL10_50.SQLEXPRESS\MSSQLServer\LoginMode value to 2.

 5. Close Registry Editor and return to Command Prompt

6. Run net start MSSQL$SQLEXPRESS

 7. Run SQLCMD –S .\SQLEXPRESS

8. Enter alter login 'sa' enable

9. Enter alter login 'sa' with password ='MyPassword'

10. Close the Command Prompt, you are done

 for sqlexpress 2012 do the following

 8. Enter alter login [sa] enable go

 9. Enter alter login [sa] with password =N'passwordhere' go

10. Close the Command Prompt, you are done now you will be able to install joomla , wordpress , drupal , ets ... with sql server

 references
 http://joeblog.homnick.com/Lists/Posts/Post.aspx?List=db4a6966-2b11-448d-a4ba-1550e74c89ba&ID=65 http://forums.asp.net/t/1861816.aspx/1?SqlServer+Authentication+

Monday, January 14, 2013

N-tier vis MVC architecture


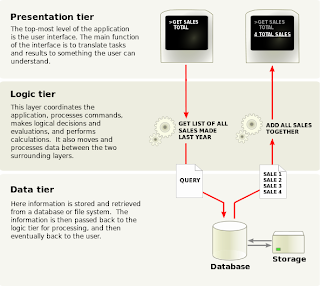
At first glance, the three tiers may seem similar to the model-view-controller (MVC) concept; however, topologically they are different. A fundamental rule in a three tier architecture is the client tier never communicates directly with the data tier; in a three-tier model all communication must pass through the middle tier. Conceptually the three-tier architecture is linear. However,

 the MVC architecture is triangular: the view sends updates to the controller, the controller updates the model, and the view gets updated directly from the model.


N-tier Concept


MVC -CONCEPT


References

http://en.wikipedia.org/wiki/Model-view-controller


Difrence between Platform-specific model and Platform-independent model

A platform-specific model is a model of a software or business system that is linked to a specific technological platform (e.g. a specific programming language, operating system, document file format or database). Platform-specific models are jruri for the actual implementation of a system.
For example, a need to implement an online shop. The system will need to store information regarding users, goods, credit cards, etc. The designer might decide to use for this purpose an Oracle database. For this to work, the designer will need to express concepts (e.g. the concept of a user) in a relational model using the Oracle's SQL dialect. This Oracle's specific relational model is an example of a Platform-specific model.


A Platform-Independent Model (PIM) in software engineering is a model of a software system or business system, that is independent of the specific technological platform used to implement it.


foe example using PHP DATA OBJECT  ( PDO)  in php language for model this maks you able to connect with different technologies such as MSsql , mysql , oracle , etc .. without needing to depend on spastic sql query for specific  database technology 


References


http://en.wikipedia.org/wiki/Platform-specific_model

http://en.wikipedia.org/wiki/Platform-independent_model

Software design

is a process of problem solving and planning for a software solution.

If the software is "semiautomated" or user centered, software design may involve user experience design yielding a story board to help determine those specifications. If the software is completely automated (meaning no user or user interface), a software design may be as simple as a flow chart or text describing a planned sequence of events. There are also semi-standard methods like Unified Modeling Language and Fundamental modeling concepts. In either case some documentation of the plan is usually the product of the design.

A software design may be platform-independent or platform-specific, depending on the availability of the technology called for by the design.
Software design can be considered as putting solution to the problem(s) in hand using the available capabilities. Hence the main difference between Software analysis and design is that the output of the analysis of a software problem will be smaller problems to solve and it should not deviate so much even if it is conducted by different team members or even by entirely different groups. But since design depends on the capabilities, we can have different designs for the same problem depending on the capabilities of the environment that will host the solution (whether it is some OS, web, mobile or even the new cloud computing paradigm). The solution will depend also on the used development environment (Whether you build a solution from scratch or using reliable frameworks or at least implement some suitable design patterns)


References

 http://en.wikipedia.org/wiki/Software_design


MS in Computer Science with paid training in USA company